TeCoEd (Teaching Computing Education)
  • Home
    • Freelance
    • Book
    • Downloading
  • Python
    • Learn Python >
      • Python Modules
    • PyGame Zero
    • Python Programs >
      • Higher or Lower
      • Magic Calculator
      • Password Checker
      • Python Pit
    • What's News App
    • Pixels to Cells
    • Python Mosaics
    • Python OCR
    • L-1-AM
    • Web Scraping >
      • Scraping Trains
    • Weather App
    • Snakes and Windows
    • Python Web Server >
      • Flask
    • Python Picks
  • Ras Pi
    • All About the Pi
    • Getting Started
    • Remote Desktop and VNC
    • Static IP Address
    • Sonic Pi >
      • 3.14
    • Twitter Feed >
      • Tweepy
    • Android & Pi >
      • Advanced Apps
      • Odds
    • A.I on the the Pi
    • CRON
    • Pick Your Own
  • Pi Hardware
    • Pi HATS >
      • Sense Hat Hacks
      • AstroPi HAT
      • Unicorn-HAT >
        • Unicorn Alphabet Disco
        • Uni Codes / Programs
      • Skywriter
      • Piano HAT
    • STS Pi
    • Pi Camera >
      • Pi-Cam, Python & Email >
        • Time Lapse
      • Pi Noir
    • Pipsta >
      • Flask, Input & Printers
    • Raspberry Pi Power >
      • Energenie IR power
    • Pibrella
    • Distance Sensor
    • LCD Screen
    • Pi-Tooth
    • Robot Arm
    • PiGlow
    • PiFM
    • Accelerometer
    • PiFace >
      • Installing PiFace >
        • Python Commands
  • Pi-Hacks
    • Drone Hacks
    • Pi Glue Gun Hack
    • Blinkt!
    • Sonic Pixels
    • R2D2
    • Get to the chopper
    • Astro Bird
    • Twitter Translator
    • Hacking a Robot
    • Nature_Box >
      • Best Nature Photos
    • Wearable Tech >
      • Project New York
      • P.N.Y Part 2 Health
      • P.N.Y Part 3 Games
      • P.N.Y Part 4 Translation
    • Dino-Tweet
    • Other Links
  • Pi-Hacks 2
    • The Joker
    • Hologram Machine
    • Google Vision: Camera Tell
    • Yoda Tweets
    • Pi Phone
    • Darth Beats
    • Twitter Keyword Finder
    • Crimbo Lights Hack
    • Xmas Elf
    • Halloween 2016
    • Halloween Hack 2015
    • Socrative Zombie
    • Voice Translation
    • The Blue-Who Finder
    • GPIO, Twitter
    • Pi Chat Bot >
      • Dictionary Definitions
    • PiGlow & Email
    • Pibrella Alarm System
    • SMS with Python >
      • Spooking a Mobile
  • Pi-Hacks 3
    • LED Dance Suit
    • Ferminal
    • Crypto Tracker
    • David Bowie
    • Lamp Prank >
      • TEST
    • Yoda FM
    • Retro Player
    • LED Pixel Art
    • TARDIS
    • Battleships
    • LED Board
    • Night Vision
    • Enviro+ Weather
  • Minecraft
    • Minecraft API
    • Minecraft Sweeper
    • PiGlove: Minecraft Power Up
    • Minecraft Photo-booth
    • Rendering Pixels
    • Speed Cube
    • Lucky Dip
  • Computing
    • Why Computing?
    • Can You Compute
    • micro:bit
    • Coding Resources
    • Learn to Code >
      • Coding with iPads
      • Apps Creation Tools
      • sKratchInn
      • Sound Editing
    • Cheat Sheets
    • Theory
    • HOUR OF CODING
    • BEBRAS Computing Challange
    • Computer Facts
    • Free Software and Links
  • Contact Me
  • Random Hacks
    • Movile

What is it?


An accelerometer is a device that measures acceleration ("g-force").  I bought one from @Pimoronin an Adafuit ADXL345 (a triple axis accelerometer) which costs around £16.  Pimoroni  provide a really useful python module to get started with the ADXL345.  Martin O'Hanlon has a good set of instructions to set up the component and this is based on it as a beginners guide.

1. Getting Started


Firstly it needs connecting up, this is the part which I found the most tricky, once all the pins are soldered in, then connect the cables.  There are four connections : GND - GND,   3V - 3V3,   SDA - SDA,   SCL -  SCL.  And this is the part where I was stuck!  However below are the pin numbers that I used on a B+ model., which means the GND is further down.  The pin numbers refer to the physical pin not the GPIO number,

Pin 39:   GND - GND,      
Pin 1:   3V - 3V3,       
Pin 3:   SDA - SDA,   
Pin 5:   SCL -  SCL.   
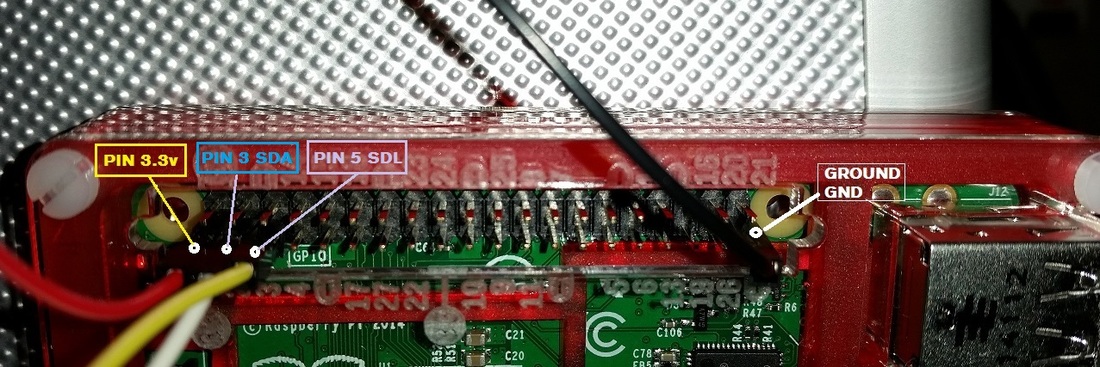
Picture
Wiring Up

2. Preparing the Pi 


The ADXL345 uses the I2C bus, which requires you to change and configure a few lines of code on your Raspberry Pi: 

Load the LX Terminal and type:
sudo nano /etc/modules 
Add the following lines to the  end:
i2c-bcm2708
i2c-dev 


Save the code and then remove I2C from the blacklist, comment it out using a hash # , open the following file:
sudo nano /etc/modprobe.d/raspi-blacklist.conf
when it loads change the 
blacklist i2c-bcm2708 so it reads #blacklist i2c-bcm2708 

Reboot to make the changes, type, sudo reboot

3. Install the Software


Next up install the python modules for the I2C, ensure the Pi is connected to the Internet and load the LX Terminal, type the following:
sudo apt-get install python-smbus i2c-tools git-core
then type sudo reboot

4. Testing the ADXL345


It is possible to test that the I2C is working properly and that the software is installed.   The I2C should pick up the accelerometer on address 53.

In the LX Terminal Type:
sudo i2cdetect -y 1

5. Python Module


The ADXL345 requires a Python module to support the programs you will code. This can be downloaded at GitHub but it is below.  Save the file into the Raspberry Pi home folder Home/Pi and ensure that it is saved in the same folder where your program will be saved.  (Thanks to Jonathan Williamson)
Python Module
File Size: 3 kb
File Type: py
Download File


6. Test Programs


Below are two example programs to try, the first measures the change in the X. Y. Z in Gs and the second as the change in acceleration. 
Program 1
File Size: 0 kb
File Type: py
Download File

Program 2
File Size: 0 kb
File Type: py
Download File

Powered by Create your own unique website with customizable templates.