THE SOCRATIVE ZOMBIE
|
As a teacher I am always looking for new ways to support students to learn and develop understanding. One of my students made a zombie head which I rescued from the display cabinet. Imagine a zombie that sensed you were in the room and asked you questions about your learning? First, let's make it ask for some Brains!
|
1. Getting StartedThis simple hack makes use of a PIR which can be purchased here for about £2.99. The sensor is sensitive enough to detect changes in the temperature as a person or animal works past or near. Using a Python script the 'motion' can be used used to trigger an event, such as turning on an LED, moving a part or even speaking and asking a question.
2. Wiring UpThe wiring of the PIR is very simple and uses only three of the GPIO pins. The PINS stated here are the physical pin numbers on the Raspberry Pi not the GPIO numbers. The +5V pin on the PIR connects to PIN 2 on the GPIO board, the OUT connects to PIN 26 and the Ground connects to PIN 6.
|

3. The Test ProgramNext step is to create the program to respond to the event that is triggered by the PIR sensor. First update the Raspberry Pi software and then start a new Python window:
In the LXTerminal: sudo apt-get update sudo idle Then type the following code this is originally from ModMyPi and will test that the sensor is working: import time import RPi.GPIO as GPIO GPIO.setmode(GPIO.BCM) PIR = 7 GPIO.setup(PIR, GPIO.IN) print "Ready to find you" time.sleep(2) def Motion_Sensing(PIR): print "We see you" try: GPIO.add_event_detect(PIR, GPIO.RISING, callback=Motion_Sensing) while 1: time.sleep(100) except KeyboardInterrupt: print "Quit" GPIO.cleanup() Program Code
|
4. The GPIO PINs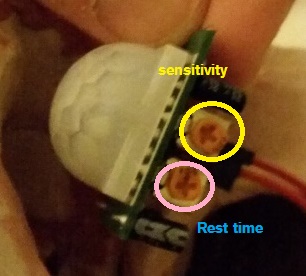
When the previous code is run, you should see the words "We see you" displayed in the terminal window each time the sensor is triggered. If not there may be a few areas to check.
1) Ensure that the wires are connected correctly, the Pi is orientated so that the audio jack is on the left hand side and the USB ports are at the end, the SD card is nearest to you. 2) PIN 26 on the GPIO is the the trigger, since we are using the BCM settings the PIN is referenced as PIN 7 in the code. 3) The PIR has two dials that can be changed to adjust the settings of the PIR. The first is to adjust the sensitivity which will make the PIR trigger more or less. The second dial adjusts the rest time between the sensor stopping and then restarting again. This is originally set around a few second delay. 5. Adding Sound and an LEDOnce the Sensor is triggered the next step is to return a response or output for the user to see, the Zombie has to react!. The Zombie calls out a demand for brains or scream. Collect a number of wav files and numbers them 1 to 10. Using Python create a variable that picks a random number between 1 and 10, ie it picks a random wav file to play. PyGame has the facilities to play the wav file, call the pygame mixer and then locate the wav file which is saved in the /home/pi/ folder..
list_of_sounds = str(random.randint(1,9)) pygame.mixer.init(frequency=22050,size=-16,channels=4) sound = pygame.mixer.Sound("/home/pi/" + list_of_sounds + ".wav") sound.play() Finally add an LED to PIN 11 (GPIO 17) and add it to the code with GPIO.setup(17, GPIO.OUT). To flash the LED use the code below to turn the PIN on and off, GPIO.output(17, True) time.sleep(0.3) GPIO.output(17, False) The final part is to set up a Cron job to start the Program when ever the Raspberry Pi is booted up - click here for the instructions | ||||

