What is it?In this project we are going to make a Photo Booth in Minecraft that when the player Steve, enters, the Pi Camera is triggered and this takes a picture of the person playing the game and saves the image to view later. This was an concept that came to me whilst at Picademy in the Minecraft workshop, a photo booth within a game that reacts in the real world. (TIOT)
1. Getting StartedBefore you get started you will be required to install the Python Pi-Camera Module and the Raspberry Pi Minecraft edition.
In the LX Terminal type: sudo apt-get upgrade sudo apt-get update apt-get install python-picamera or apt-get install python3-picamera Next install the Minecraft files: wget http://goo.gl/o2aene -O mcpi.tar.gz --no-check-certificate Once the file has downloaded you will need to extract the file, this command will create a new directory in your home folder called mcpi, which is where the Minecraft installation files will be set up. Type: tar xzf mcpi.tar.gz then to run the game type: cd mcpi ./minecraft-pi 2. Set up the PiCameraOnce your PiCamera is attached we need to create a function to capture the picture, this is very simple and can be achieved in a few lines of code. The picture can be previewed using the code, camera.start_preview(). To take the picture use the code camera.capture('selfie.jpg'). Where selfie is replaced with the name you wish to call the file, the filename. You will be required to run the Python code as a super user, so open the LX Terminal and type sudo IDLE, this opens Python, then create the the function below.
import time import picamera def take_a_selfie(): with picamera.PiCamera() as camera: camera.start_preview() time.sleep(2) camera.capture('selfie.jpg') take_a_selfie() Save the file into the pi.mcpi/api/python folder. Press F5 or run to test that the Pi Camera takes a picture. 3. Find the Players LocationThe next part of the program is to identify where exactly the player is within the Minecraft world. There are three coordinates X, Y and Z that can be used to reference the position of the player. Once we know the position of the player we can then compare that with the position of the Photo-booth, if they match then you are in the photo-booth. Remember this code needs to be run as a super user.
The code to find your location and print the co-ordinates is: import mcpi.minecraft as minecraft import time mc = minecraft.Minecraft.create() while True: pos = mc.player.getPos() x = pos.x y = pos.y z = pos.z print x, y, z time.sleep(2) |
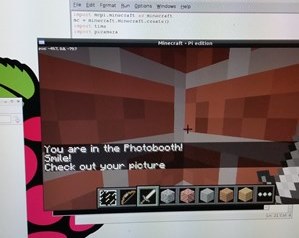
"Say Cheese!"4. Are you in the Photo-Booth?The final stage is to create the Photo-Booth and then run the code to compare the player's position and the position of the Photo-Booth, if they match that means that player is in the booth and therefor the Pi Camera will be triggered and a take a picture. A simple IF, ELIF statement makes this easy. In the example below the post to chat command is used to notify the player that they are in the booth.
import mcpi.minecraft as minecraft import time mc = minecraft.Minecraft.create() while True: pos = mc.player.getPos() x = pos.x y = pos.y z = pos.z print x, y, z time.sleep(2) if x == -49.7 and y == 8.0 and z <= -79.7: print "You are at the photobooth!" mc.postToChat("You are in the Photobooth!") else: print "" 5. Putting it all TogetherNow add the PiCamera code from step 2 into the if statement so that if the player's position matches the Photo-booth then take a picture. Remember that the program needs to be saved into the mcpi/api/python folder. Start a new MC game, when it is loaded then run the Python program. Locate your Photo-booth walk in and Smile! You could adapt the code so that it saves anew picture or takes only one picture and then pauses before taking another, even better see if your friends on multi-player can be papped!
Code Links
| ||||
- Home
- Python
- Ras Pi
-
Pi Hardware
- Pi-Hacks
-
Pi-Hacks 2
- The Joker
- Hologram Machine
- Google Vision: Camera Tell
- Yoda Tweets
- Pi Phone
- Darth Beats
- Twitter Keyword Finder
- Crimbo Lights Hack
- Xmas Elf
- Halloween 2016
- Halloween Hack 2015
- Socrative Zombie
- Voice Translation
- The Blue-Who Finder
- GPIO, Twitter
- Pi Chat Bot >
- PiGlow & Email
- Pibrella Alarm System
- SMS with Python >
- Pi-Hacks 3
- Minecraft
- Computing
- Contact Me
- Random Hacks