What is it?The Adafruit plate makes it easy to use a 16x2 Character LCD directly via the GPIO pins on your Raspberry Pi . The screen is available in booth positive and negative displays. This LCD does require quite a few digital pins, 6 to control the LCD and then perhaps another 3 to control the RGB backlight for a total of 9 pins. That's nearly all the GPIO available on a Raspberry Pi, so other bolt-ons are out. This plate is perfect for when you want to build a stand-alone project with its own user interface. The 5 directional buttons plus select button allows basic control without having to attach a bulky computer. It is not pre-assembled and therefore requires some soldering skills and time or a friend called Dave!
1. Getting StartedLoad the LX Terminal:
sudo apt-get update sudo apt-get upgrade Firstly enable the hardware drivers, while still in the Terminal Window type: sudo nano /etc/modules When the file opens add the two lines below to the bottom of the list. i2c-bcm2708 i2c-dev 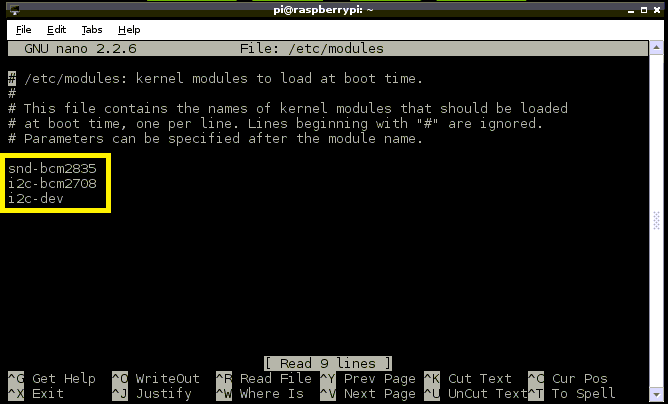
2. Python LibrariesHit the Control and X keys to save and exit and then Reboot the Pi with
sudo reboot, this will enable the hardware I2C driver. Next step is to install the various Python libraries to enable you to program the LCD Screen, the GPIO assess and enable the System Management Bus. In the LX Terminal Window type: sudo apt-get install python-smbus sudo apt-get install pytho n-dev sudo apt-get install pytho n-rpi.gpio 3.Test LibraryThe LCD Pi Plate Python code for Pi is available on Github at:
https://github.com/adafruit/Adafruit-Raspberry-Pi-Python-Code or (http://adafru.it/aOg) The easiest way to downlaod the code onto your Pi is to hook up an Ethernet cable, and clone the files directly using 'git'. In the LX Terminal simply run the following sudo apt-get install git git clone https://github.com/adafruit/Adafruit-Raspberry-Pi-Python-Code.git then chage (cd) to the Adafruit folder with cd Adafruit-Raspberry-Pi-Python-Code and change to the folder with the test code cd Adafruit_CharLCDPlate then run the following program and press the buttons on your LCD screen sudo python Adafruit_CharLCDPlate.py or try: testLCD.py |
LCD in ActionPython CodeInterfacing with the python example code is fairly straight forward, if you look in the Adafruit_CharLCDPlate folder you can open a simple Python script called testLCD.py, open this in IDLE to view the code.
If you are saving your own program into a different folder then you will need to ensure that the following two Python modules are also copied and saved into the same folder, Adafruit_I2C.py, Adafruit_MCP230xx.py and Adafruit_CharLCDPlate.py IMPORT THE MODULES The first part of your program is to import the libraries and initialise the plate with this creates the LCD object and starts communicating with the plate, type: lcd = Adafruit_CharLCDPlate() WRITE A MESSAGE You can write your message to the screen with the code: lcd.message("your text to display goes here") The screen can display up to 16 characters per line so use the newline code \n to write to the second line lcd.message("This is the first line\nThis is the second") Before the next message is display the screen needs to be cleared, type: lcd.clear() CHANGE THE SCREEN COLOUR The LCD has several preset colours that can be used to backlight the screen (unless you have the monochrome version). The colours are RED, YELLOW, GREEN, TEAL, BLUE and VIOLET. To set the backlight colour use the code: cd.backlight(lcd.name of the colour you want) Setting it to green would be: cd.backlight(lcd.GREEN) USING THE BUTTONS There are 5 buttons (LEFT, RIGHT, UP, DOWN and SELECT) which can be used to with the code to ask the plate which button has been pressed. buttonPressed(lcd.name of button) where name of button is LEFT, RIGHT, UP, DOWN or SELECT. This is not an interrupt-driven library so you can't have an interrupt go off when a button in pressed, instead you'll have to query the button in a loop. EXAMPLE COMING SOON.... SCROLL A MESSAGE: COMING SOON - more tricky than I thought! Although not an exact match many if these commands work |
- Home
- Python
- Ras Pi
-
Pi Hardware
- Pi-Hacks
-
Pi-Hacks 2
- The Joker
- Hologram Machine
- Google Vision: Camera Tell
- Yoda Tweets
- Pi Phone
- Darth Beats
- Twitter Keyword Finder
- Crimbo Lights Hack
- Xmas Elf
- Halloween 2016
- Halloween Hack 2015
- Socrative Zombie
- Voice Translation
- The Blue-Who Finder
- GPIO, Twitter
- Pi Chat Bot >
- PiGlow & Email
- Pibrella Alarm System
- SMS with Python >
- Pi-Hacks 3
- Minecraft
- Computing
- Contact Me
- Random Hacks
