Sonic PixelsI often wonder what other things sound like. Things that don't have sound for example, a plant, tiles and more recently images. What does a picture sound like? So much of the world is surround and run on data and information, can it be transferred? Can an image be converted into sound? I though I would try it out. This hack takes an image and runs through pulling out each the pixel colour value. The program then uses this to calculate and assign a MIDI value to each value. The Pi is set up as a Wireless Access point which means anyone can connect to Sonic Pixel via their device and upload an image. to hear what it sounds like.
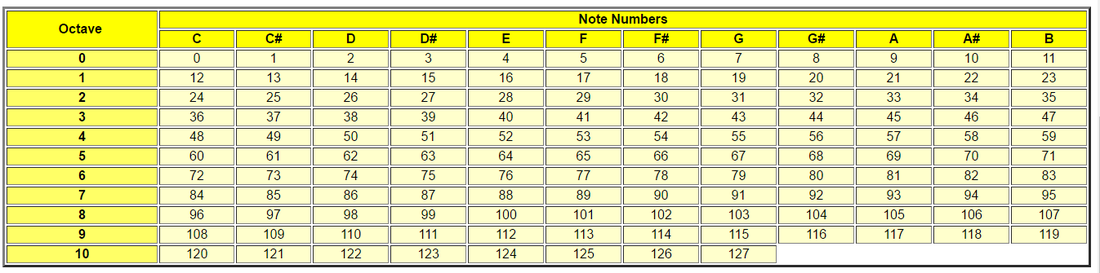
1 Getting StartedSo I came across Jon Witts's image program which looks at an image and then pulls out a list of all the RGB values. These values are used to build up the colour of each pixel in an image. So for example, a white pixel has the RGB values of 255, 255, 255 yellow is ,255, 255, 0 and so on. There are a total of 16777216 possible colors! The idea was to take these values and convert them into MIDI note values. Looking at the table below you can see that the note C has a value of 63, so the RGB value if 63 could be assigned to the note C.
2. Pulling out the RGB valuesThe first part of the hack is to pull out the RGB values from the image and save them. This uses Jon Witt's program, the original can be found here. To use it you will need to install the Python Imaging Library (PIL).
In the LX Terminal type: sudo apt-get update sudo apt-get upgrade pip3 install Pillow The key line of code is on line 34 which gets the pixel and returns the RGB values. These need to be stored so they are added into a list called row_pixel and then each value us appended using the code row_pixels.append(str(rowdata)) r, g, b = rgb_im.getpixel((col - 1, row - 1)) rowdata += "(" + str(r) + "," + str(g) + "," + str(b) + ") " 3. Writing the Data to a FileThe data stored in the list can be a huge amount. Consider a standard image of 2 mega pixels, 1920 x 1080 in size, the total amount of pixels would be 2073600!
This number will slow down the program so best to write it to a text document. This speeds up the process and reduces the lag. This is achieved with four simple lines of code, the first opens the text document. On line 3 each set of values is written to the text file, before it is closed in line 4. file = open("RGB_values.txt", "w") for i in row_pixels: file.write(str(i) + '\n') file.close() 4. Sort the DataSo, now you have all the RGB pixel data pulled from your image and stored in a text file, you can open this and have a look. Notice that the data for each RGB set is stored in brackets and separated by a common, (255, 255, 255). In this form this is not yet suitable for use as a MIDI note, it requires a little stripping. Re open the text file and create a new list called pixels. On line 4 strip out the blank space and then on line 5 the brackets and again split down the numbers. The last two lines convert the values into an integer, a number so that they can be manipulated and used to work out the MIDI notes. Finally each value is appended to the pixel list and saved so that it can be used in the next step.
with io.open('RGB_values.txt', 'r') as input_file: pixels = [ ] for line in input_file: for triple in line.strip().split(' '): r, g, b = triple.strip('()').split(',', 2) pixel = (int(r), int(g), int(b)) pixels.append(pixel) Thank to Les an Dave for their help on this one. 5 Converting into a MIDI ValueYou now have a set of data that can be used for MIDI notes but, if you looked at the table opposite you will see that the top note value is 127 and this is a very high note, only audible by most dogs. Take an image such as the one below, there is a lot of white which will produce values of 255, 255, 255 which will not register as a MIDI note, you will be waiting a long time for any notes to play. It will be more akin to the avant-garde style of John Cage.

Therefore use a quick algorithm to reduce the value of the RGB value. This is as simple as adding together the three values and dividing by 3. Then rounding the number so you have one final number.
for pixel in pixels: r, g, b = pixel total = (round((r + g + b)/3)) For example (255, 255, 255) does not produce anything significant, you end up with 255. But take say (175, 100, 100) and you get 125 which is a playable MIDI note, although it is a very high note. Since you cannot hear all the notes in the range it makes sense to limited the ones that are added to the final list. Use a simple conditional to check if the note value is less than 123 and greater than 31. These numbers worked well as the ceiling note, any higher and I could not hear it. if total< 123: > 31: notes.append(total) |
Musical Images in Action5. Installing the Note PlayerNow I have a text file and list of the notes that I want to play and that I can hear within my audio range. To pay the notes I decided to use a Python interface for Sonic Pi, https://pypi.python.org/pypi/python-sonic. This means that I do not have to have a hundreds of MP3 files for every note. Sonic Pi will do the work for me.
To install type: $ pip3 install python-sonic To play a note open Python and it is as simple as: from psonic import * play(70) # play MIDI note 70 You have to start Sonic Pi in order to run the Python SONIC, so will have to set up this at the beginning of boot up. 7. Playing the Notes
The final part of playing the notes is to loop through the list of notes and play each one. This uses a simple code:
for note in notes: print (note) try: play(note) except: print("can't play") time.sleep(0.1) 8. Uploading an Image File
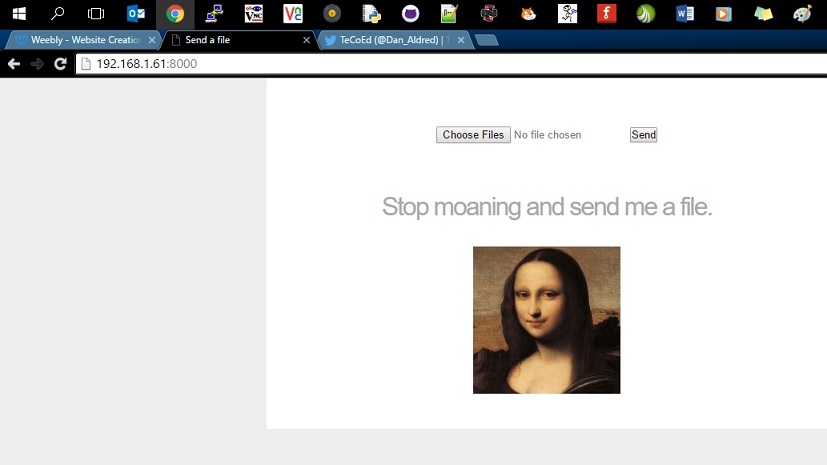
In order to make the project more interactive and more public, users can upload an image from a website and it will be converted. Originally I had planned to use Flask but then came across a neat little program called DROOPY. This is a cool web-server and set up is simple.
Download the script Open the LX Terminal and type sudo chmod +xdroopy Copy the file to the /bin area Type cp ~/droopy /bin Create a new foler for uploads and move to that folder mkdir ~/uploads cd ~/uploads Then run the program sudo python /bin/droopy -m "Hi, " -p ~/avatar.png You may get a permission error which is easily sorted by typing, sudo --chmod 777 * this will make all the files in the folder readable. You can then run this from within the Python program using the os code line and transfers the files to be read and converted into music. 9. Finding the FilesNow that the images can be up loaded the program needs to check for images and create the musical pixels for that image. This uses a library called glob which makes extremely simple to find particular files and returns a list of them.
For example: import glob files = glob.glob('*.jpg') print (files) print (files[3]) Finds all the files that end in jpg, The 3rd line prints all the files names and the last line prints the forth item in the list, the forth image file name. 10 Resize the ImagesWhen converting the images to notes I found that the larger pictures could contain over several 1000 notes, even with the higher and lower frequencies removed. So the images are resized using the code:
with Image.open('logo.jpg') as im: width = im.size width_size = int(width[0]) basewidth = 125 img = Image.open('logo.jpg') wpercent = (basewidth/float(img.size[0])) hsize = int((float(img.size[1])*float(wpercent))) img = img.resize((basewidth,hsize), PIL.Image.ANTIALIAS) img.save('new.jpg') 10. Displaying the ImageI thought that it would be cool and useful to display the image on the screen that is being converted and play as 'pixel music' This was achieved using PyGame to display the image on the screen and it works with Python 3.
picture = pygame.image.load("name_of_file.jg") picture.get_size() pygame.display.set_mode(picture.get_size()) main_surface = pygame.display.get_surface() main_surface.blit(picture, (0, 0)) pygame.display.update() To ensure that the program always plays the next image file, the previous image is deleted after it has been analysed and converted into MIDI notes. This means that when the program iterates again it finds the next picture in the list., converts it and plays and displays it. |

Final Features |
Download the Code Here |
To make the sonic pixels a stand alone project, I set uop the Raspberry Pi as a Wireless Access point an AWP. This enables anyone within the broadcast area to connect directly to the Sonic Pixel interface and upload images from their mobile device, phone, tablet or other. There is an excellent tutorial here
Next, once you access the Sonic Pixels you are greeted with a website which allows you to redirect to the Droopy upload, this was based on the code and concepts found here:
Next, once you access the Sonic Pixels you are greeted with a website which allows you to redirect to the Droopy upload, this was based on the code and concepts found here:
