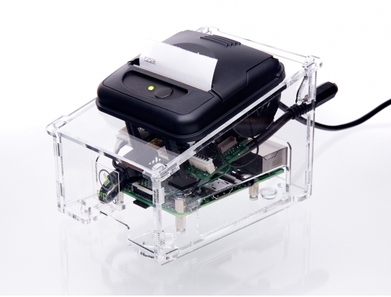
The Pipsta PrinterPipsta is a smart little printer that’s full of big ideas. You can link your Pipsta to your Raspberry Pi and do all sorts of things – from printing labels to tickets. It is easy to set up and comes with a great set of instructions with diagrams and simple steps. The Pipsta printer can be purchased from the ModMyPi website.
Use the Pipsta and its NFC capabilities to tap into the Internet of Things, Internet of People and beyond! It comes supplied with all the parts that you require. The Pipsta USB interface enables a fast, convenient set up and fast transmission. Using thermal printing technology the Pipsta prints quickly, quietly and clearly. |
|
|
There is a detailed set of instruction and setup guide which will walk you through the physical putting together of the Pipsta printer. Allow yourself about 40 minutes. The only tricky part is ensuring you use the correct holes for the USB and Power cables. When clipping together the frame ensure the cables are tidy and fed through the around the Raspberry Pi.
|
| ||
1. Install the SoftwareBefore you use your Pipsta Printer there are a number of software modules that need to be installed, firstly ensure that your Raspberry Pi is up to date and then install all the software listed below:
In the LX Terminal type:
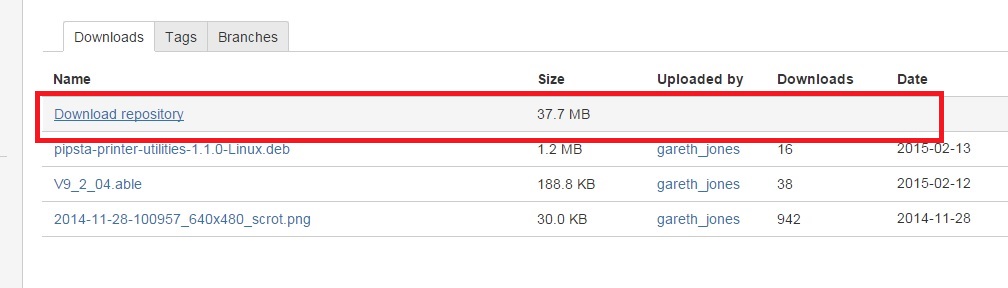
2. Download the ProgramsNext step is to download the programs to enable the Pipsta to communicate with the Raspberry Pi and Python. The download is available at the following site. Select the file at the top called "download" as shown in the picture below and download it! Check for updates and a newer version on the site
Once downloaded navigate to the folder and double click the zip folder called ablesystems.... Extract all the files - simply,
sudo cp 60-ablesystems-pyusb.rules /etc/udev/rules.d sudo cp usblp_blacklist.conf /etc/modprobe.d sudo shutdown –r now In each case, ensure you have typed the space before the ‘/etc’. Connect up the printer and you are ready to go. 3. Testing the PrinterNow you are ready to test your Pipsta printer is working, do this by going to the File Manager, load up and try some of the provided example programs, go to: pipsta\Examples\1_Basic_Print folder
Open the terminal window by pressing [F4] Run a simple Python script by entering the following: python BasicPrint.py Hello from Pipsta\! the t You can open the example programs in IDLE and run and edit them directly from here. To chaneg the message that is printer, find the variable txt = and then add your new text or message. Try out some of the other programs too. |
A 7 day Weather ForecastCode coming soon....The program users the weather data that is available from Yahoo.com/weather. The method to obtain and scrap this data is discuss in the following article if you looking for more detail. Firstly you will need to install the Python Parser to grab the data from the Yahoo Website.
In the LX Terminal type: sudo apt-get install python-feedparser Open the program below and look for the line, rss_link ='http://weather.yahooapis.com/forecastrss?w=41415&u=c' The number 41415 refers to the county / town or location where you want the weather to be grab for the city of York. You can follow the link here to select your own City and retrieve the unique number. Replace the 41415 with the number for your city or location. When the program runs it will retrieve all the XML data which looks like this. Some of the data is useful but most of it is not required - therefore you have to strip it. The entries includes all the information required for the seven day weather forecast. Create a variable to store this data: summary = d.entries[0].summary Next step is to find where the weather report begins, this is where it says Current Conditions again create a variable. report_pos = summary.find("Current Conditions:") Then use the code to start replacing all the XML tags with blanks, this keeps the spacing the same but removes the redundant tags such as <br>, quite a lot of stripping! Then strip out any empty white space. weather_report1 = new_text.replace("<br />","") weather_report2 = weather_report1.replace("<b>","") weather_report3 = weather_report2.replace("</b>", "") weather_report4 = weather_report3.replace("- ", "") weather_report5 = weather_report4.replace(": ", "") final_weather_report = weather_report5.strip(" ") Final Code
| ||
