Part 1: Getting StartedIn the LX Terminal :
First update the Raspberry Pi software, sudo apt-get update The Serial Peripheral Interface Bus or SPI needs to be enabled to allow communication between the PiFace and the Raspberry Pi. To enable this, sudo nano /etc/modprobe.d/raspi-blacklist.conf hash out the spi-bcm2708, it should read as below: #blacklist spi-bcm2708 Save and exit the file, ensure the Pi is connected to the Internet and download the drivers for the PiFace. wget http://pi.cs.man.ac.uk/download/install.txt Then, to run the script in the terminal, type: bash install.txt This may take up to 30 minutes Then restart the Raspberry Pi, sudo reboot Easy Option: A pre-installed OS image is available at http://pi.cs.man.ac.uk/download/ 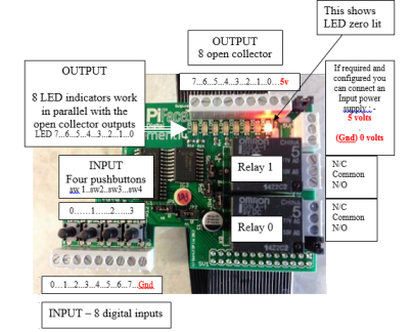
Diagram from Brain Lewis
|
Part 2: Testing the PiFaceThe PiFace comes with pre-installed Emulator so that you can test that all the inputs, relays etc are working correctly.
The PiFace consists of:
In the LX Terminal : ~/piface/scripts/piface-emulator 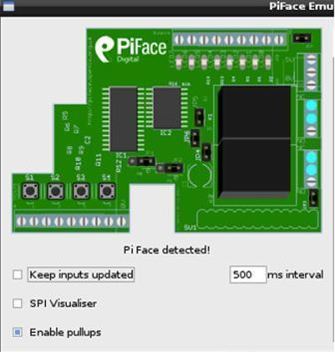
Testing the Outputs
Select the Override Enabled, then select one of the Output Pins from the GUI. The corresponding LED on the PiFace will toggle on and off. It is also possible to toggle ALL the LEDs using All On / Flip or All Off Testing the Inputs Select the Keep inputs updated, and the Inputs can be tested. Press each of the buttons on the real PiFace and the switch will be toggled. |
- Home
- Python
- Ras Pi
-
Pi Hardware
- Pi-Hacks
-
Pi-Hacks 2
- The Joker
- Hologram Machine
- Google Vision: Camera Tell
- Yoda Tweets
- Pi Phone
- Darth Beats
- Twitter Keyword Finder
- Crimbo Lights Hack
- Xmas Elf
- Halloween 2016
- Halloween Hack 2015
- Socrative Zombie
- Voice Translation
- The Blue-Who Finder
- GPIO, Twitter
- Pi Chat Bot >
- PiGlow & Email
- Pibrella Alarm System
- SMS with Python >
- Pi-Hacks 3
- Minecraft
- Computing
- Contact Me
- Random Hacks
