What is it?The Pirates at Pimoroni say that you can unlock your inner Mozart with Piano HAT, the ultimate mini musical companion for your Raspberry Pi! It is inspired by Zachary Igielman's PiPiano and made with his blessing. Basically it is a a dinky piano add-on for the Raspberry Pi, with touch-sensitive keys and LEDs. It is used to play music in Python, control software synths on your Pi, take control of hardware synthesizers, or surprise us with your creativity!
1. Setting it UpPimoroni have made it extremely easy to install the software for your Piano HAT. Simply attach the board and boot up your Raspberry Pi, load the LX Terminal and update the software, type:
$ sudo apt-get update $ sudo apt-get upgrade Once completed type the following line $ sudo curl -sSL get.pimoroni.com/pianohat | bash Follow the instructions displayed on the screen, these involve given permission to install the software and agreeing to the changes that the library makes. 
The Example ProgramsThe software install comes with a great set of example programs to get you started and to demonstrate the coolness of the Piano HAT. There are four different events that can control these are:
Included in the examples program folder is: simple-piano.py This is the basic piano, press the key and the note is played and the LED is lit up. Press the octave buttons and the notes go up or down, press the instrument and you have a drum kit. learn-to-play.py: The LED for the note to be pressed lights up, press the key and the note is sounded, the next LED lights up, press this key and so on, follow the LEDs learn to play a simple melody. leds.py The corresponding LED lights up but the note is not played. You can also control the Piano HAT LEDs. You can turn all of the LEDs on and off at will, useful for creating a visual metronome, prompting a user which key to press and more, use these codes: set_led(x, True/False) - lets you set a particular LED to on ( True ) or off ( False ). auto_leds(False) - stops Piano HAT from automatically lighting the LEDs when a key is touched To access the examples type cd pianohat to change to the Piano HAT folder, then type sudo python and the name of the program that you which to run. 
$ cd pianohat

Full GitHub Code
|
Music to your Blocks2. Minecraft Mash-UPIn these two simple hacks you can combine the Piano HAT with Minecraft. Each block in MC has an ID, each note on the Piano has an ID, you can use these IDs as block identifies. Each time a note is pressed the code works out the relevant block ID and then returns that block. Think of it as a representation of musical notes in Minecraft. The second hack creates a horizontal representation or path across the MC world as you play your melody.
3. Piano BlockTo create the Piano Block program load the Pimoroni piano code and add the import the normal Minecraft libraries and the code to locate the player and return the player's x, y and z position.
mc = minecraft.Minecraft.create() x,y,z = mc.player.getTilePos() Next find the def handle_note(channel, pressed): line of code and add the following lines below shown in purple. The first line prints the channel ID, it is not required but useful for testing. Line 2, takes the channel number and stores it as a variable called Block, this becomes the block ID. The final line sets a Minecraft block at the players first location, three blocks higher and three to the left. def handle_note(channel, pressed): global move channel = channel + (12*octave) if channel < len(samples) and pressed: print('Playing Sound: {}'.format(files[channel])) print channel ### Saves the channel number / note as a variable to compare to block Block = channel samples[channel].play(loops=0) ###Sets block infront of you### mc.setBlock(move, y+3, z+3, Block) 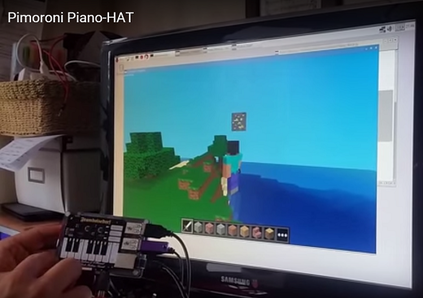
4. Music WalkThe Music Walk program is similar to the Piano Block except that the notes or blocks are placed horizontally next to each other creating a line of the medley that is played. In the same definition block as used in step 3 add the follwng lines below as shown in purple.
def channel < len(samples) and pressed: print('Playing Sound: {}'.format(files[channel])) print channel ### Saves the channel number / note as a variable to compare to block Block = channel samples[channel].play(loops=0) ###Sets block infront of you### mc.setBlock(move, y+3, z+3, Block) move = move + 1 ###add one to the x pos to move notes along
|
- Home
- Python
- Ras Pi
-
Pi Hardware
- Pi-Hacks
-
Pi-Hacks 2
- The Joker
- Hologram Machine
- Google Vision: Camera Tell
- Yoda Tweets
- Pi Phone
- Darth Beats
- Twitter Keyword Finder
- Crimbo Lights Hack
- Xmas Elf
- Halloween 2016
- Halloween Hack 2015
- Socrative Zombie
- Voice Translation
- The Blue-Who Finder
- GPIO, Twitter
- Pi Chat Bot >
- PiGlow & Email
- Pibrella Alarm System
- SMS with Python >
- Pi-Hacks 3
- Minecraft
- Computing
- Contact Me
- Random Hacks
