What is it?
The Raspberry Pi never ceases to amaze, did you know that it can be used as an FM Transmitter? This quick hack enables you to record a 'broadcast' save it and then transmit it on your preferred frequency. It really is that simple.
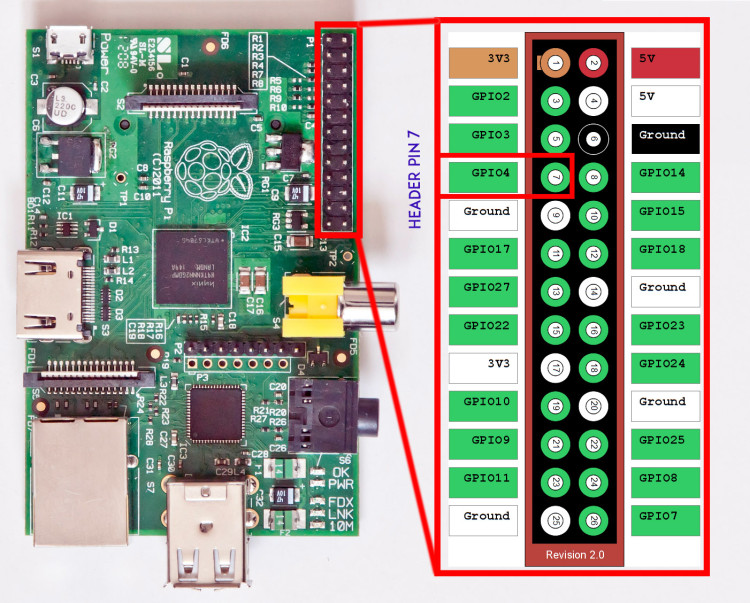
Setting up the HardwareSetting up the Hardware is really easy. In fact there is no need to attach anything as the Pi can transmit directly from the pin 7 without a need to alter anything. However, you will probably want to extend the range of the broadcast by adding a wire to GPIO 4, pin number 7, unbelievably this can extend the range of the broadcast up to 100 meters.
Creating a File to Broadcast
The Files broadcasted by the PiFM need to be in .wav format. Audacity is a free suitable software tool for recording, editing and exporting the sound files in the appropriate file format. Before you export the file the sample rate needs to be set to around 22050 and the sample format to 16bit . This ensures that the sound plays at the the correct speed, otherwise it is to slow and to deep or it will be too squeaky and fast. Save the file into the PiFM folder or transfer the file across if you are using another device.
|
Raspberry-FMInstall the SoftwareIn the LX Terminal :
Make a new directory to extract the files into: mkdir PiFMcd PiFM Then download the required Python files as a tar / compressed file. sudo apt-get update sudo apt-get upgrade wget http://www.omattos.com/pifm.tar.gz Extract the files tar xvzf pifm.tar.gz Navigate to the PiFM folder or your folder and then broadcast the WAV file with: sudo ./pifm name_of_wav_file.wav 100.0 Change to name of the file to the name of your sound file. The 100.0 is the FM frequency of the broadcast, this can be changed between a range of 88 and 108 MHz. Turn on your Radio and adjust to the appropriate frequency and you will hear your message begin played. Simple! If you wish to end the broadcast before the song / voice has finished then you will need to kill the transmission. In a new terminal window type top. This will list all the running programs, look for PiFM somewhere near the top, note the ID number. Return to the LX Terminal and type sudo kill 2345, replacing the 2345 with the appropriate Process ID number. This ill ensure that each broadcast is new and the Pi is only trying to transmit one wav file at a time. |
- Home
- Python
- Ras Pi
-
Pi Hardware
- Pi-Hacks
-
Pi-Hacks 2
- The Joker
- Hologram Machine
- Google Vision: Camera Tell
- Yoda Tweets
- Pi Phone
- Darth Beats
- Twitter Keyword Finder
- Crimbo Lights Hack
- Xmas Elf
- Halloween 2016
- Halloween Hack 2015
- Socrative Zombie
- Voice Translation
- The Blue-Who Finder
- GPIO, Twitter
- Pi Chat Bot >
- PiGlow & Email
- Pibrella Alarm System
- SMS with Python >
- Pi-Hacks 3
- Minecraft
- Computing
- Contact Me
- Random Hacks
