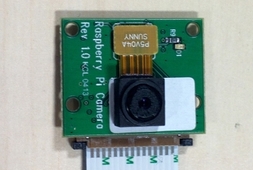
What is it?The Raspberry Pi Camera is a small and cheap add on module which allows you to take images and HD video input to projects such as security systems, logging in or even time lapse photography, all for £16
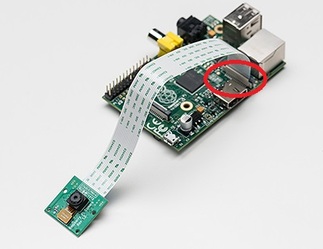
InstallationThe first step is to add the camera to Raspberry Pi board. It is IMPORTANT that you ensure that you remove all / any static by touching a radiator first. The camera can be damaged or destroyed by static. The blue part points away from the HDMI port.
Start the Raspberry Pi as normal. Access the configuration,
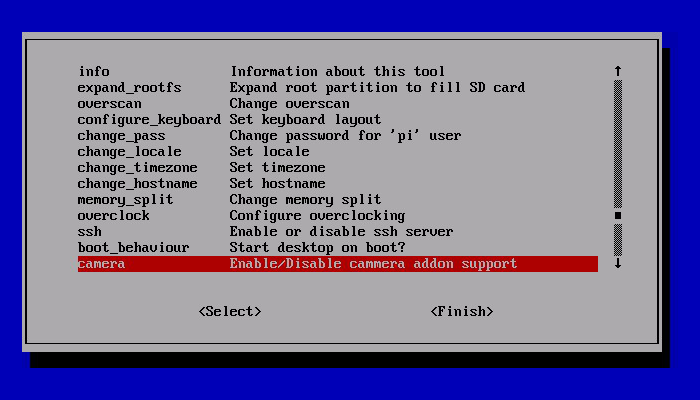
sudo raspi-config and enable the camera as shown below, then reboot. Update the Raspberry Pi : sudo apt-get update Upgrade: sudo adpt-get upgrade To test that the camera is working correctly, enter the following code in the LX Terminal, raspistill -v -o test.jpeg. There should be a preview on screen and a picture will be taken and saved as test, this will be saved in home / pi folder.
|
Taking PicturesTaking your first picture is easy and uses the simple command raspistil
The next parameter is –o or output, this is the name of the file you wish to save the image as, for example raspistill –o keyboard.jpeg, saves the picture as a file called keyboard The other parameter is the –t which is the time in milliseconds that a preview will be displayed for, the default preview time is set to 5 seconds. To take a picture; raspistill –o name_of_file. jpeg Taking VideosTaking a video works in a similar pattern but uses the command raspivid
When using raspivid the –t refers to time that the camera will film for. For example raspivid –o file_name.h264 –t 1000, will film for 10 seconds (H.264/MPEG-4 Part 10 or AVC (Advanced Video Coding) is a video compression format, and is currently one of the most commonly used formats for the recording, compression, and distribution of video content. The final drafting work on the first version of the standard was completed in May 2003.) Other CommandsTo demo the selection of features the camera has type raspivid –d
More parameters and codes for the camera module can be acquired by using the command raspistill | less raspivid | less Pi Vision: downloadable GUI here

Raspi Camera Remote:
An Android app for controlling your Raspberry Pi Camera from your mobile or tablet. Enter your IP address into the App and shot away. Photos can then be saved directly to your phones gallery. Known IssuesThere are several blogs making reference to errors and issues with the Camera, ensure you are using the latest version of the OS and ensure that all static is removed before you use the camera. It is also worth double checking the connections on the camera and the RasPi
If things are still not working, try the following: Error : raspistill/raspivid not found. This probably means your update / upgrade failed in some way. Try it again. Error : ENOMEM displayed. Camera is not starting up. Check all connections again. Error : ENOSPC displayed. Camera is probably running out of GPU memory. The gpu_mem option should be at least 128. | ||||||
- Home
- Python
- Ras Pi
-
Pi Hardware
- Pi-Hacks
-
Pi-Hacks 2
- The Joker
- Hologram Machine
- Google Vision: Camera Tell
- Yoda Tweets
- Pi Phone
- Darth Beats
- Twitter Keyword Finder
- Crimbo Lights Hack
- Xmas Elf
- Halloween 2016
- Halloween Hack 2015
- Socrative Zombie
- Voice Translation
- The Blue-Who Finder
- GPIO, Twitter
- Pi Chat Bot >
- PiGlow & Email
- Pibrella Alarm System
- SMS with Python >
- Pi-Hacks 3
- Minecraft
- Computing
- Contact Me
- Random Hacks


