TeCoEd (Teaching Computing Education)
  • Home
    • Freelance
    • Book
    • Downloading
  • Python
    • Learn Python >
      • Python Modules
    • PyGame Zero
    • Python Programs >
      • Higher or Lower
      • Magic Calculator
      • Password Checker
      • Python Pit
    • What's News App
    • Pixels to Cells
    • Python Mosaics
    • Python OCR
    • L-1-AM
    • Web Scraping >
      • Scraping Trains
    • Weather App
    • Snakes and Windows
    • Python Web Server >
      • Flask
    • Python Picks
  • Ras Pi
    • All About the Pi
    • Getting Started
    • Remote Desktop and VNC
    • Static IP Address
    • Sonic Pi >
      • 3.14
    • Twitter Feed >
      • Tweepy
    • Android & Pi >
      • Advanced Apps
      • Odds
    • A.I on the the Pi
    • CRON
    • Pick Your Own
  • Pi Hardware
    • Pi HATS >
      • Sense Hat Hacks
      • AstroPi HAT
      • Unicorn-HAT >
        • Unicorn Alphabet Disco
        • Uni Codes / Programs
      • Skywriter
      • Piano HAT
    • STS Pi
    • Pi Camera >
      • Pi-Cam, Python & Email >
        • Time Lapse
      • Pi Noir
    • Pipsta >
      • Flask, Input & Printers
    • Raspberry Pi Power >
      • Energenie IR power
    • Pibrella
    • Distance Sensor
    • LCD Screen
    • Pi-Tooth
    • Robot Arm
    • PiGlow
    • PiFM
    • Accelerometer
    • PiFace >
      • Installing PiFace >
        • Python Commands
  • Pi-Hacks
    • Drone Hacks
    • Pi Glue Gun Hack
    • Blinkt!
    • Sonic Pixels
    • R2D2
    • Get to the chopper
    • Astro Bird
    • Twitter Translator
    • Hacking a Robot
    • Nature_Box >
      • Best Nature Photos
    • Wearable Tech >
      • Project New York
      • P.N.Y Part 2 Health
      • P.N.Y Part 3 Games
      • P.N.Y Part 4 Translation
    • Dino-Tweet
    • Other Links
  • Pi-Hacks 2
    • The Joker
    • Hologram Machine
    • Google Vision: Camera Tell
    • Yoda Tweets
    • Pi Phone
    • Darth Beats
    • Twitter Keyword Finder
    • Crimbo Lights Hack
    • Xmas Elf
    • Halloween 2016
    • Halloween Hack 2015
    • Socrative Zombie
    • Voice Translation
    • The Blue-Who Finder
    • GPIO, Twitter
    • Pi Chat Bot >
      • Dictionary Definitions
    • PiGlow & Email
    • Pibrella Alarm System
    • SMS with Python >
      • Spooking a Mobile
  • Pi-Hacks 3
    • LED Dance Suit
    • Ferminal
    • Crypto Tracker
    • David Bowie
    • Lamp Prank >
      • TEST
    • Yoda FM
    • Retro Player
    • LED Pixel Art
    • TARDIS
    • Battleships
    • LED Board
    • Night Vision
    • Enviro+ Weather
  • Minecraft
    • Minecraft API
    • Minecraft Sweeper
    • PiGlove: Minecraft Power Up
    • Minecraft Photo-booth
    • Rendering Pixels
    • Speed Cube
    • Lucky Dip
  • Computing
    • Why Computing?
    • Can You Compute
    • micro:bit
    • Coding Resources
    • Learn to Code >
      • Coding with iPads
      • Apps Creation Tools
      • sKratchInn
      • Sound Editing
    • Cheat Sheets
    • Theory
    • HOUR OF CODING
    • BEBRAS Computing Challange
    • Computer Facts
    • Free Software and Links
  • Contact Me
  • Random Hacks
    • Movile

What is it?


The Raspberry Pi Camera Module also comes in NoIR, this stands for No Infa Red.  This means that you can use the camera to take photos and video footage in the dark, yes, just like a night vision camera.  The camera set up and the commands are the same as used with the regular Pi Camera module, no change there.
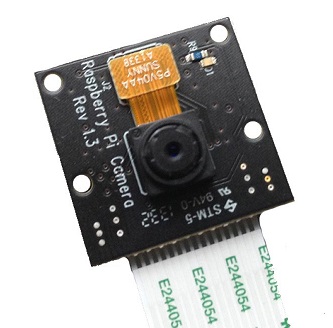
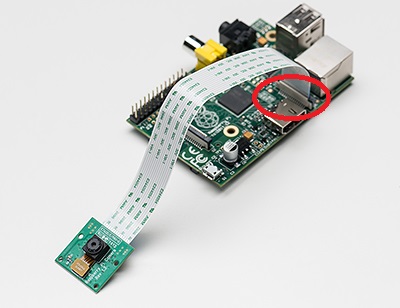
Pi Cam
Fix here

1. Installation 


The first step is to add the camera to Raspberry Pi board.  It is IMPORTANT that you ensure that you remove all / any static by touching a say, radiator first.  The camera can be damaged or destroyed by static. The blue part points away  from the HDMI port.
Start the Raspberry Pi as normal.  Access the configuration, 
sudo raspi-config and enable the camera as shown below, then reboot.   

Update the Raspberry Pi :   sudo apt-get update
Upgrade:                               sudo adpt-get upgrade
Picture
To test that the camera is working correctly, enter the following code in the LX Terminal, raspistill -v -o test.jpeg.  There should be a preview on screen and a picture will be taken and saved as test, this will be saved in home / pi folder.

2. Basic Instructions 
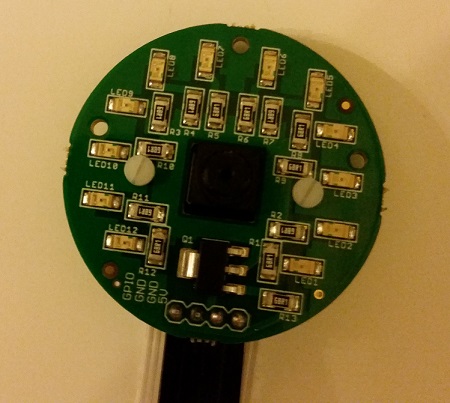

  • Taking your first picture is easy and uses the simple command raspistil
  • The next parameter is –o or output, this is the name of the file you wish to save the image as, for example raspistill –o keyboard.jpeg, saves the picture as a file called keyboard
  • The other parameter is the –t which is the time in milliseconds that a preview will be displayed for, the default preview time is set to 5 seconds.
  • To take a picture;    raspistill –o name_of_file. jpeg
  • Taking a video works in a similar pattern but uses the command raspivid 
  • When using raspivid the –t refers to time that the camera will film for.  
  • For example raspivid –o file_name.h264 –t 1000, will film for 10 seconds


Night Vision 


3. But wait, it does not work!


But wait, you will notice when you take you first shot in the dark that it does not work, there is not night vision spy style photos.  There is no fault and the camera is not faulty.  What you require is an Infa-Red LED or a selection of them, and, I have the perfect solution.  The LISIPAROI is an add on for the Raspberry Pi camera module, and has been designed to provide additional illumination when taking pictures or recording video. It also features extra mounting points which is perfect for using custom mounts or even a gooseneck holder.
Picture
There are two versions, a standard for the the orginal Camera and also and IR version.  The infrared LISIPAROI (noted with clear LEDs) has 12 infrared LEDs arranged around the camera module to offer a wide spread of light when used in low/zero light conditions making it perfect for security or night wildlife activities.  Each LED has a wavelength of 940nm, perfect for the PiNoir module.


4. Connecting it up


Connecting the LISIPAROI is easy, simply, take four female to female leads and attach them to the pins on the LISIPAROI, then connect the camera wire to the camera.  Connecting the pins to the Raspberry Pi is easy too, each pin is labelled, 5V, GND, GND and GPIO. The 5v and GPIO pins are easy to locate and there are several ground or GND pins you can use.
Picture
Picture
Picture
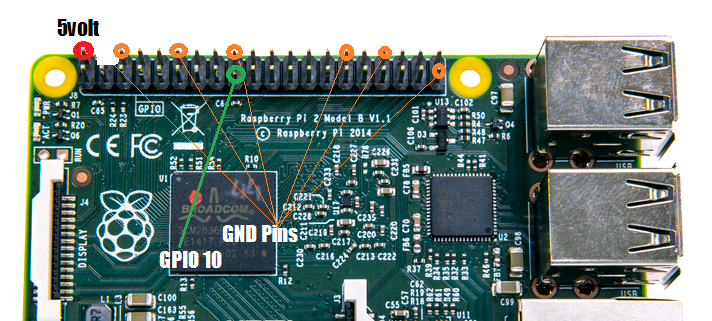
GPIO pins to use to connect up
Because you are using the physical board pin number remember to count them to ensure you have the correct pin number in the code.  For example GPIO 10 is physical pin number 17.  Now you have your LISIPAROI connected and ready to take a picture.  Use the example code below check it is all working correctly.
Buy it here
NoIR Camera Example
File Size: 0 kb
File Type: py
Download File

NoIR Video Exampe
File Size: 0 kb
File Type: py
Download File

Powered by Create your own unique website with customizable templates.