What is it?Flask is a Python library that allows you to set up and create a dynamic web server directly on the Raspberry Pi. A web server stores webpages of information. In this hack you can set up a simple webpage which asks the user to enter in some text. This text is then inputted and printed out to the pipsta printer. It is like an organic text message and the great thing is that it works on any device on the network
1. Installing FlaskTo install Flask you may first need to install , in the LX Terminal:
sudo apt-get install python-pip sudo pip install -U pip Once installed use pip to then install Flask sudo pip install flask. Now Flask is installed and you are ready to create your first dynamic webpage and host it via your Pi Server 2. Setting up the WebsiteThe first part of the hack is to set up a template for the website which either you or other users will access and enter in the sentence, phrase or words that they want the Pipsta printer to print. In the Pi/Home folder make a new folder called templates open the folder. Within this folder create a new text file and save it with the extension .html. In this example the file is called my-form.html. Open the file and add the following HTML:
<!DOCTYPE html> <html lang="en"> <body> <h1>Enter some text</h1> <h2>(it will be printed to the Pipsta)</h2> <form action="." method="POST"> <input name="text"> <input name="my-form" value="Send"> </form> </body> </html> The 4th and 5th lines are the message that will be displayed on the webpage - this can be changed if you wish. Lines 6, 7 and 8 are the form and the instructions on which template to return the input to, this is on Line 8, <input name="my-form" value="Send">. Once finished, save the file. If you open the file in your web browser you will see the layout below, although it will not function yet. 2. Setting up the Python CodeOpen IDLE and start a new Python file, save this file into the same folder as the templates folder, but not in the templates folder. In line 4 of the code it makes reference to the name of the template that you create before, my-form.html. Line 9 is the Print_me() function which prints the text to the Pipsta printer. The text = request.form['text'] takes the input that the you enter on the website and then runs the function that prints the text. Finally the program returns the message informing you that your message has been printed!
app = Flask(__name__) @app.route('/') def my_form(): return render_template("my-form.html") @app.route('/', methods=['POST', 'GET']) def my_form_post(): global text text = request.form['text'] Print_me() return "You message is being printed" if __name__ == '__main__': app.run(host='0.0.0.0', port=80, debug=True) |
A Message to Print3. Download the Program and Template
4. Find you IP AddressThe final step to accessing the printer is to find the IP address of your Raspberry Pi which you will connect to.
In the LX Terminal type: sudo ifconfig Note the IP Address and start the Flask application. 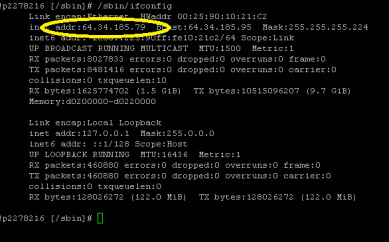
In the LX Terminal type:
sudo python name_of_your-file.py On you other device open the web browser and in the address bar type the IP Address of your Raspberry Pi and you should see the message that was coded into your Flask app is shown. 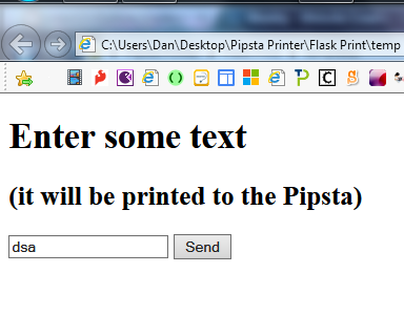
| ||||||
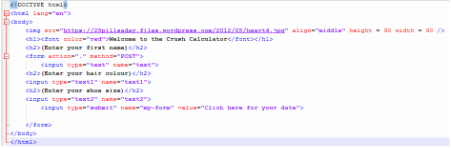
What is it?Using the most advanced computational algorithm know to Barry White, this app takes your name, hair colour ad shoe size and calculates your perfect crush. There are no errors this system is full proof and accurate. The program makes use of the Pipsta "print image" program and a simple HTML template allowing the user to interface with the complex Eros pheromone system.
|
The Love Doctor App | ||||||
