What is it?Flask is a simple Python library that allows you to set up and create a dynamic web server directly on the Raspberry Pi. A web server stores webpages of information. When you access a website via the www address you are in fact accessing a web server that is hosting (holding) the data. Flask can be combined with Python code host forms, databases, webpages and much more.
Installing FlaskTo install Flask you may first need to install , in the LX Terminal:
sudo apt-get install python-pip Once installed use pip to then install Flask sudo pip install flask. Now Flask is installed and you are ready to create your first dynamic webpage and host it via your Pi Server Getting StartedThis very simple app will allow you to display a message via the web browser on any device connected to the network. (WiFi or cable)
Open IDLE and type the following code: from flask import Flask app = Flask(__name__) @app.route("/") def hello(): return "enter_your _message_choice_here" if __name__ == "__main__": app.run() This creates a simple code that will display the messages every time the Raspberry Pi is accessed via its IP Address. It is useful to add a debugging code line and access to the Raspberry Pi Server outside the network, this is achieved by adding the following code to the end of the program. This enables the program to listen for error messages and reports whenever the site is accessed. Modify the Python Code: from flask import Flask app = Flask(__name__) @app.route("/") def hello(): return "enter_your _message_choice_here" if __name__ == "__main__": app.run(host='0.0.0.0', port=80, debug=True) Then save the code as a .py file with a suitable name such as message.py |
Accessing the RasPi ServerThe next step to accessing the message is to find the IP address of your Raspberry Pi which you will connect to.
In the LX Terminal type: sudo ifconfig Note the IP Address and start the Flask application. 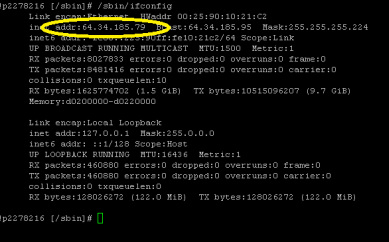
In the LX Terminal type:
sudo python name_of_your-file.py On you other device open the web browser and in the address bar type the IP Address of your Raspberry Pi and you should see the message that was coded into your Flask app is shown. The message that you wrote in the return section of the definition will not display on your browser. You Pi may return a message to state that the server has been accessed and there are no errors.
|
- Home
- Python
- Ras Pi
-
Pi Hardware
- Pi-Hacks
-
Pi-Hacks 2
- The Joker
- Hologram Machine
- Google Vision: Camera Tell
- Yoda Tweets
- Pi Phone
- Darth Beats
- Twitter Keyword Finder
- Crimbo Lights Hack
- Xmas Elf
- Halloween 2016
- Halloween Hack 2015
- Socrative Zombie
- Voice Translation
- The Blue-Who Finder
- GPIO, Twitter
- Pi Chat Bot >
- PiGlow & Email
- Pibrella Alarm System
- SMS with Python >
- Pi-Hacks 3
- Minecraft
- Computing
- Contact Me
- Random Hacks
